Wired Vehicle Tracker
Table of Contents
Below are the installation instructions for your device.
To view the device on your portal, please ensure to activate your device.

Installing Your Wired Tracking Device
- Wiring the device into a vehicle is easy, and requires installation inside the passenger compartment of the vehicle.
- The MOTOsafety wired device has a series of wires — you will only need to attach three of these wires to your vehicle (the additional wires are for future features or functions).

- The three wires you need are: the red wire (power), the black wire (ground), and the white wire (ignition sense).
- Locate a connection point in the vehicle for constant power, such as the fuse box. Remove the insulation on the selected wire.
- Connect the red wire on the MOTOsafety device to the vehicle's constant power wire. This connection allows the device to receive power when ignition is off and on.
- Connect the MOTOsafety black wire to your vehicle’s chassis. This connection serves as a ground for the device.
- Locate the vehicle’s ignition wire (reference the vehicle’s wiring diagram in order to locate).
- Verify the ignition wire by measuring the operating voltage while the key is turned to the ON or START position (the voltage should read 0 VDC when the key is in the off position, and typically between 11V and 14V when in the ON position).
- Connect the white wire on the MOTOsafety device to the vehicle’s ignition wire. This connection allows the device to report ignition OFF and ON events.
- An optional plastic zip tie is included to secure the device under the vehicle dash with the label that reads “Label Side Down” facing down.
NOTE: Visit https://www.MOTOsafety.com/wiredinstall to watch a video on the installation process.
- Confirm the power connection.
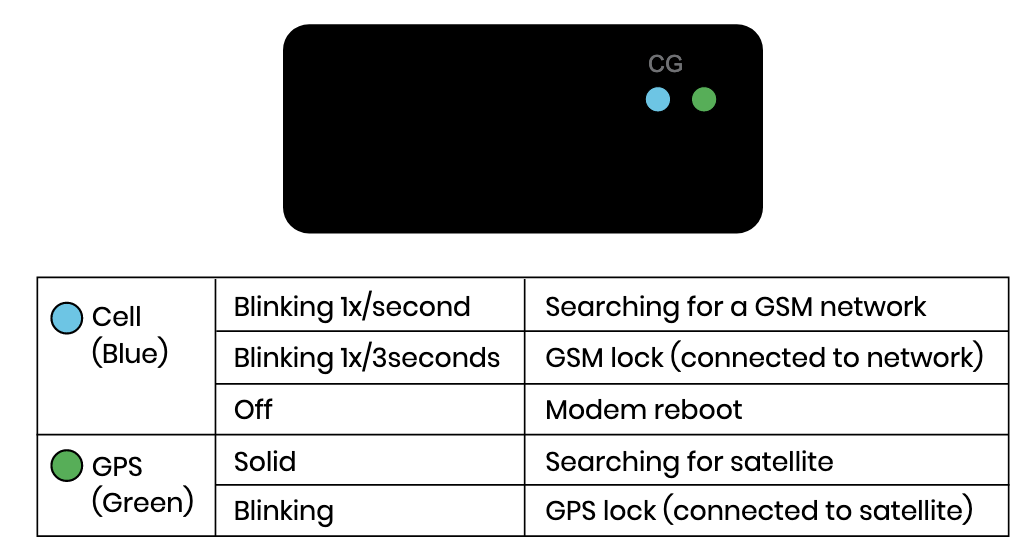
- Following installation, allow 5-10 minutes for the MOTOsafety device to power up and obtain a cellular and GPS fix. Your vehicle must be outside and not in a covered area so that it will receive GPS signal. When working properly, the blue light will blink once every 3 seconds and you will see a blinking green light.
- You should see your car’s location on the map (may take up to two hours).
NOTE: Should your vehicle require a jump start, you will have to replace the fuse in the wiring harness with a 3 amp fuse.
That's it! You're ready to start tracking.
Now it's time to start customizing your account. Visit our features section to learn how to set up users, geofences, alerts, and more.